New Pattern: Cordulia Cowl

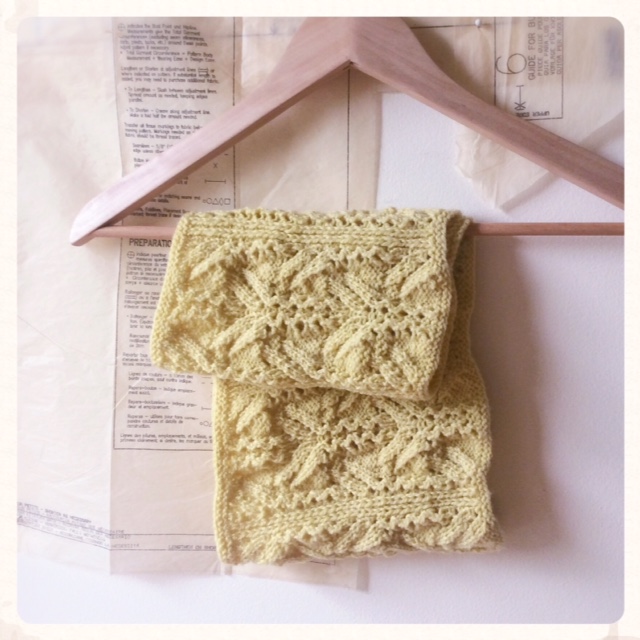
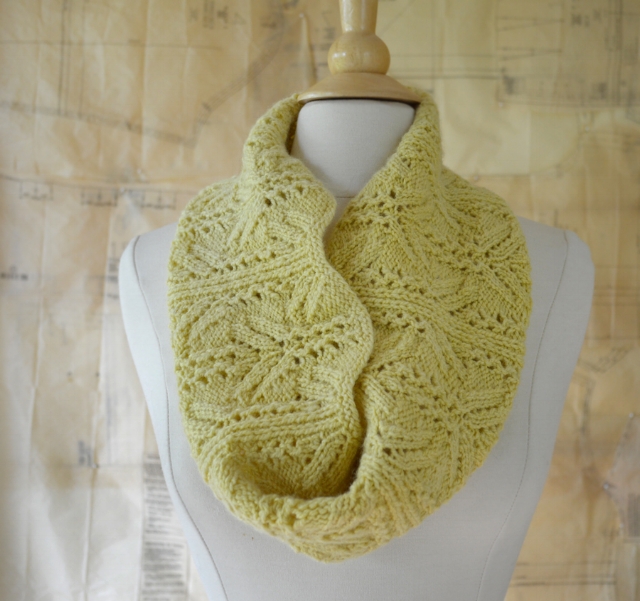
Another dragonfly-inspired design has winged its way into my Ravelry pattern store! The Cordulia cowl is now ready for your knitting needles.

Cordulia_Indoors_1.jpg

To celebrate its release, I'm having an introductory sale: through Sunday, September 24, save 25% on Cordulia with the coupon code COWL25.

Cordulia_Outdoors_2.jpg
Cordulia_Indoors_3.jpg

Named after a genus of dragonflies, Cordulia is one of three lace accessories in my new ebook collection, Dragonfly Days. The first was the Enallagma shawl, released earlier this summer. The third and final design will be released this fall. 

Cordulia_Outdoors_1.jpg
Cordulia_Indoors_5.jpg

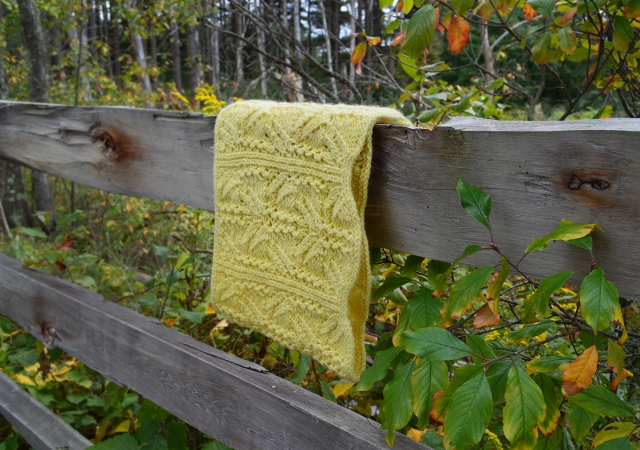
The Dragonfly Days collection was born during the early days of summer 2017. As I swatched a pretty lace stitch for the Enallagma shawl, I really loved two things about it — the way the cast-on edge naturally formed gentle scallops, and the way parts of the lace resembled dragonfly wings.

The more I worked on the shawl, the more I wanted to explore the lace stitch further. So I played around with it, modifying it to create Cordulia. From start to finish, designing this cowl was an enjoyable process, and I can't wait to work with this beautiful lace stitch again for another design.

Cordulia_Indoors_2.jpg

I’ve always been fascinated by dragonflies. I love their glittering wings. I love watching them dart back and forth over the water. Although they’re so quick, they make me want to slow down — slow down and pay closer attention to the natural world. 

With the Dragonfly Days patterns, you can keep the warmth of summer and the magic of dragonflies near you all year long. I hope you enjoy them — and thanks very much for reading!

dragonfly at Lower Lake.JPG

Sneak Peek: Cordulia Cowl

The marigold-dyed cowl is finished! Here it is, just off the needles and ready for blocking:

IMG_3912.JPG

I'm going to call it Cordulia, which is a genus of dragonflies. This is my second dragonfly-inspired design (the first was the Enallagma Shawl). I used a 24-inch US5/3.75mm circular needle and one skein of Foxhill Farm DK-weight Cormo, which I dyed with marigolds (it took about 295 yards/270 m). If you're curious about how I dyed the yarn, there's more info in this blog post.

Here's how it looks after a light blocking:

IMG_3927.JPG

I've finished the pattern and sent it off to my tech editor, so it won't be too long before it's ready to publish. Look for it before the end of September.

P.S. The Free Fall KAL in the Blue Peninsula Ravelry group just kicked off the other day. Each week as we knit, we're also discussing a different topic. This week the topic is: What are your favorite resources for learning new techniques? Books and magazines, classes at your LYS, online videos, your knitting group?

Books.JPG

You're welcome to join the KAL anytime between now and November 15, to share your thoughts and knit any of my designs (new projects and WIPs are both welcome). At the end of the KAL, prizes will be awarded randomly to posts in the discussion thread, so everyone who participates has a chance to win, even if they don't finish their project. Hope to see you!

Marigold Dyeing

Happy Labor Day! I hope you're having a beautiful holiday (or a beautiful regular day, if you're not in the U.S.). I've just come back from a ride on our local bike trail. So glad I went! It's sunny, a little breezy, and an all-around gorgeous day. After yesterday's rain, there was no doubt in my mind that today had to include getting out in the sun.

IMG_3741.JPG

Sunshine has been the theme of this long weekend (even during the rainy parts), thanks to my latest natural dyeing experiment. I decided to try dyeing with marigolds, using some Cormo yarn that I bought from Foxhill Farm's booth at the Massachusetts Sheep and Woolcraft Fair in May.

It was a great success! The flowers produced a beautiful sunshine-y yellow:

IMG_3762.JPG

After consulting my favorite natural dyeing reference — Jenny Dean's Wild Color — I gathered both fresh and spent blooms from the pots of marigolds on my balcony and let them soak in water for about an hour. I strained the water into my dye pot — an old enamel pot I picked up for a few cents at a yard sale — and heated it to a very gentle simmer. While the dye pot was heating, I prepared the yarn by immersing it in a mordant bath, using a tablespoon of alum for the mordant. 

After letting the dye pot cool down a bit, I added the yarn, which immediately took on a yellow hue. So pretty! I then put the pot back on low heat and let it stay there for about 45 minutes, gently stirring the yarn every so often to promote even dyeing (but not agitating it, to avoid felting).

I'm not usually drawn to yellows for knitting but this one is just so cheerful. I couldn't wait to get it on my needles. While the yarn was drying, I got busy plotting and charting. I've already cast on a new design — a dragonfly-inspired cowl, using a modified version of the lace stitch from my Enallagma Shawl. It's coming along nicely:

IMG_3815.JPG

Every time I wear this cowl, it will remind me of summer sun lighting up the marigolds. I'm definitely going to save more of the spent blooms for dyeing again later this fall, after Rhinebeck (I'm hoping to pick up more yarn for dyeing there).

Have you ever dyed with marigolds? Or other flowers? Please leave a comment — I'd love to hear how it worked out for you. 

P.S. We're starting to plan the next KAL in the Ravelry Blue Peninsula group. I've set up a poll to find out what everybody would like to do. Hope you'll come and vote, and join us for fall knitting fun!